

The Ultimate Guide to Linocutting
Table of contents
Introduction
Final Thoughts
Whether you're a curious beginner or an experienced artist looking to refine your skills, linocutting offers a creative and rewarding way to explore printmaking. This hands-on art form involves carving into a linoleum surface, inking it, and pressing it onto paper or fabric to reveal bold, textured prints. I am a linocut printmaker and artist with over 15 years of experience in this field. I don’t just enjoy linocutting, I’m addicted to it with a passion! Learn more about me here.
In this ultimate guide, I’ll walk you through everything you need to know—from what linocut means and how linocut works, to step-by-step instructions, advanced techniques, and the best places to buy your supplies. Along the way, I’ll answer questions like “what does linocut mean,” “how is linocut effective,” and “what distinguishes a linocut from a woodcut?” Let’s get carving!
Doing what I love best, at home in my studio
1. What Is Linocut Printmaking?
So, what does linocut mean? Linocut is a form of relief printing, where the image is carved into a soft linoleum block. The uncarved areas remain raised and are inked, while the carved areas stay ink-free and white on the final print.
What is relief printing in art? Relief printing is a traditional printmaking technique in which the protruding parts of the block are inked and pressed onto a surface. This category also includes woodcuts and metal reliefs, and it’s among the oldest forms of printmaking.
How linocut works: The artist sketches a design, transfers it to the linoleum, and carves out the negative space. Ink is rolled onto the raised surface, and the image is transferred to paper or fabric using hand pressure or a printing press. The result is a bold and highly graphic image, full of texture and personal style.
What distinguishes a linocut from a woodcut? Linocuts use linoleum, which is softer and easier to carve than wood. Woodcuts, on the other hand, retain the natural grain and texture of the wood, which can become part of the design. Linocuts tend to have smoother lines and allow for more intricate detail with less effort. They are also more forgiving for beginners and are less taxing on the hands.
2. The History of Linocutting in Art
When was linocut invented? Linoleum was first created in the 1860s as a flooring material. Its use as a printmaking medium began in the early 20th century, when artists discovered its versatility and ease of carving compared to wood.
Initially seen as a less serious medium compared to woodcut, linocut gained credibility when avant-garde artists like Pablo Picasso and Henri Matisse adopted it. German Expressionists like Erich Heckel and Karl Schmidt-Rottluff also embraced linocut for its immediacy and boldness. It became a democratic medium, accessible to artists with limited means and space.
Over time, linocut has evolved into a respected printmaking method, appreciated for its crisp aesthetic and accessibility. Today, contemporary printmakers continue to push the boundaries of linocutting by integrating it into fine art, illustration, textile design, and even large-scale installation work.
3. How to Linocut Print Step by Step
If you're wondering how to linocut at home, here's a comprehensive guide:
Step 1: Design Your Image
Start with a bold, high-contrast sketch. Black-and-white drawings translate best to linocuts. Think in terms of positive and negative space. Begin with simple shapes before progressing to more detailed imagery.
I simply draw directly onto the linoleum with pencil and then work out in my mind what I will choose to carve and what will remain.
I draw directly onto the linoleum before carving
Step 2: Transfer the Design
Use tracing paper and graphite to reverse your design onto the linoleum. Remember, your print will be a mirror image of your block. Alternatively, use carbon paper or draw directly onto the block with waterproof pens. I usually draw direct in pencil from a photo I’ve taken, but flip the image first on my smartphone, so that the final print appears in the same way as the original photo.
Step 3: Carve the Block
Use linocut tools like V-gouges and U-gouges to carve away the negative space. Always carve away from your body and fingers to avoid injury. Start with broader tools for outlines and shift to finer gouges for intricate details.
Step 4: Ink the Block
Roll a thin, even layer of ink onto a glass or acrylic sheet. Load your brayer and apply ink to the raised surface of the linoleum. Ensure smooth, even coverage, checking for missed areas. TIP: To avoid fine lines being filled with ink, you can just apply several thin layers to build up coverage, rather than applying too much ink in one go!
Inked linocut in the studio ready to print
Step 5: Print
Place your paper or fabric gently over the inked block. Use a baren, wooden spoon, or printing press to apply firm, even pressure. Consistency matters—too much pressure can smudge the print; too little may result in uneven inking. Peel back slowly to reveal the print. TIP: Before completely peeling back, check for areas that haven’t picked up ink and apply further pressure to these parts using a wooden spoon or baren.
Slowly peeling back a linocut print, note the cardboard frame to protect the paper from ink and the small piece of ripped paper just to cover any random ink smears
Step 6: Dry and Clean Up
Lay prints flat on a drying rack or surface or even, hang them on a makeshift ‘washing line’ in your home studio. Water-based inks dry quickly and clean up easily with soap and water. For oil-based inks, use appropriate solvents like mineral spirits. Clean your tools thoroughly to preserve their sharpness.
Repeat this process to refine your technique, and consider keeping a printmaking journal to document your progress.
4. How to Linocut Trees
Nature motifs like trees offer an excellent opportunity to explore texture and shape in linocutting.
Begin with photo references or live sketches to understand tree anatomy and branching patterns.
Use long, flowing lines for trunks and branches; rough, jagged marks for bark texture.
Carve the negative space around foliage or needles to allow the leaves to stand out.
Vary the depth and width of your gouges to create dynamic line weight.
Try layering prints using different colors for seasonal effects (e.g., green in summer, orange in fall).
Experiment with stylization—from detailed realism to abstract interpretations. Trees make great subjects for storytelling and can reflect mood, emotion, and symbolism.
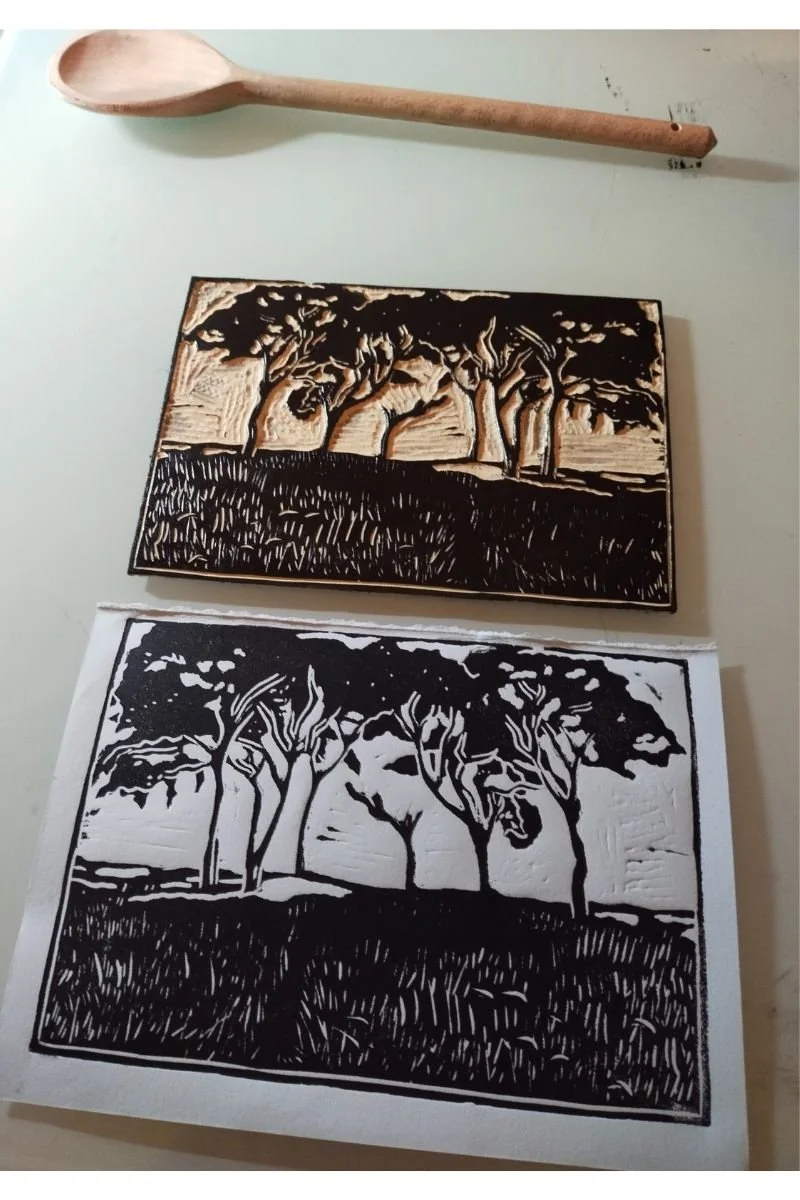
My linocut entitled ‘Seven Sisters’ fresh off the block
My ‘Seven Sisters’ linocut print (above) is inspired by an historical landmark in Houghton-Le-Spring, in my native north-east England. There are now actually just five and half trees on top ‘Copt Hill’ and they mark an ancient burial mound. Different legends surround the mysterious trees, including that the seven sisters represent seven witches that once frequented the site!
5. How to Linocut Words
Typography in linocut is especially effective for bold statements, posters, and handmade signage.
Choose a bold, legible font or hand-letter your text.
Transfer your text in reverse using tracing paper to ensure correct orientation.
Use a fine V-gouge for clarity and to avoid ragged edges.
Focus on consistent line width and spacing. A ruler can help maintain alignment.
Test prints frequently to check for legibility, and make adjustments as needed.
Lettering takes patience and precision, but the results are striking and full of handcrafted charm.
Close up detail of my linocut ‘Why Aye Man’
6. What Is Color Linocut?
Color linocut expands your creative possibilities by adding visual richness and depth through multiple hues and layers.
Two Main Methods:
Reduction printing: Use one block, carving more away between each layer of color. Plan your colors in advance, from lightest to darkest. This irreversible method requires careful registration and timing.
Multi-block printing: Carve a separate block for each color. This allows more flexibility and control but requires precise registration to ensure alignment.
Color linocut of Santorini, Greece (artist unknown)
Explore techniques like:
Gradient or rainbow rolls: Blend inks on the brayer to create smooth color transitions.
Chine-collé: Add colored or patterned paper during printing for texture and color.
Transparent layering: Use transparent inks to mix colors optically on the page.
Color linocuts require planning and patience but reward you with striking, professional-looking prints.
7. How to Sharpen Linocut Tools
Sharp tools are essential for safe, clean, and satisfying carving.
Use a whetstone or sharpening system for regular maintenance.
Hone edges with a leather strop loaded with polishing compound to keep them razor-sharp.
Maintain a consistent angle while sharpening to avoid uneven edges.
Test sharpness on a soft block: the blade should glide effortlessly without tearing.
Store tools in a dry place, ideally with blade covers, and oil them lightly if not in use for long periods.
Sharp tools make a noticeable difference in your carving precision and reduce fatigue.
8. Where to Buy Linocut Supplies
You can find linocut tools and materials both online and in physical art stores. Beginners and pros alike benefit from quality supplies.
Recommended Online Retailers:
Jackson’s Art Supplies (UK/international)
Blick Art Materials (USA)
Amazon (convenient, but vet sellers and reviews carefully)
Essential Supplies:
Linoleum blocks (traditional grey or soft-cut for easier carving)
Carving tools (Speedball, Pfeil, or Flexcut)
Brayers (soft rubber for better ink application)
Non-toxic inks (fabric-specific for textiles)
Baren or press for printing
Quality paper (e.g., Fabriano, Somerset, or lightweight paper such as Washi)
Some of my essential supplies for linocutting
Starter kits are great for newcomers but consider upgrading individual components as you gain experience.
To see what I personally use for my own linocut prints you can check out Linocutting - The tools and materials I use.
9. How to Linocut Print on Fabric
Linocut isn’t limited to paper—you can print beautiful, functional designs on textiles too.
Materials Needed:
Pre-washed, natural-fiber fabric (cotton, linen, or muslin)
Fabric-safe block printing ink (e.g., Speedball Fabric Ink, Permaset Aqua)
Plexiglass or acrylic sheet for inking
Foam or cardboard insert to prevent bleed-through
Iron or heat press for setting the ink
Printing Process:
Pre-wash and iron fabric to remove sizing and wrinkles.
Stretch and secure fabric on a flat, firm surface using tape or pins.
Ink your linoleum block evenly and press onto fabric with consistent pressure.
Carefully lift the block and inspect for clean edges and solid coverage.
Allow to dry flat for 24–48 hours.
Heat-set the ink according to manufacturer instructions (usually ironing for 3–5 minutes).
This method is ideal for creating custom t-shirts, tote bags, tea towels, wall hangings, and more. Experiment with repeat patterns and different color combinations.
Important Tips for Linocutting
From paper choices to carving depth, here’s how to improve your linocut prints instantly.
Whether you're new to printmaking or refining your technique, linocutting is a deeply satisfying and accessible art form. But as any experienced printmaker will tell you, the magic lies in the details—like how deep to carve, what paper to use, or why oil-based ink makes such a difference.
Here are my five essential tips to help you produce cleaner, more professional linocut prints—plus detailed guidance on papers, tools, and inks to take your prints to the next level.
✦ Use the Right Paper: Best Printmaking Paper for Linocutting
Choosing the right paper is just as important as your carving technique. The right surface will grab the ink, showcase your lines, and support crisp detail. Here's what to look for:
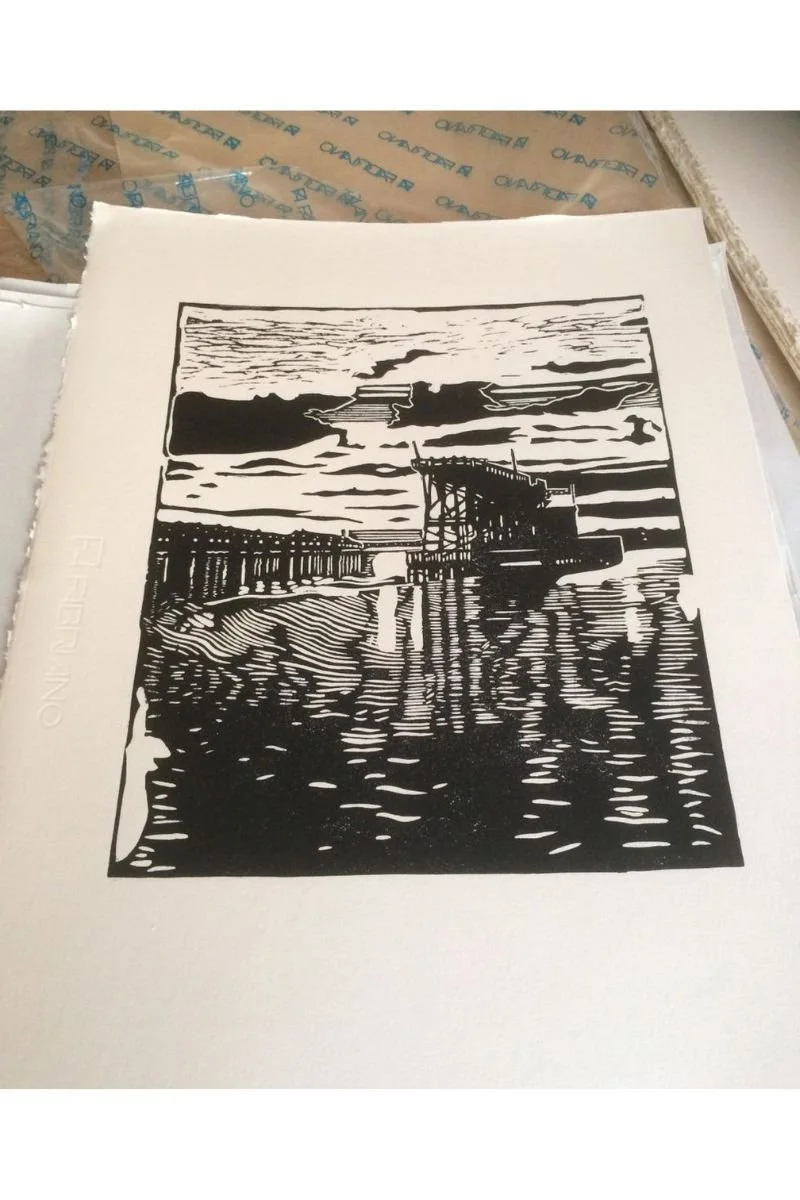
My linoprint ‘The Staithes’ printed on beautiful Fabriano Rosapina Avorio paper
Understanding GSM
GSM (grams per square meter) tells you the weight and thickness of the paper.
For hand printing, opt for 150–250 GSM to ensure easy burnishing and strong ink transfer.
Heavier papers (250+ GSM) are more suited to press printing but can work with a lot of elbow grease.
Always Go Acid-Free
Acid-free paper won’t yellow or degrade over time—essential for archival-quality prints and professional sales.
Top Papers for Linocut Printing
Japanese Washi (Kozo, Hosho, Awagami)
Lightweight but incredibly strong.
Typically 70–90 GSM, ideal for hand printing.
Absorbs ink beautifully and highlights fine detail.
Fabriano Rosapina Avorio
220 GSM, mould-made, cotton blend.
Works well with both oil- and water-based inks.
Ideal for hand or press printing.
Stonehenge Paper
250 GSM, 100% cotton, acid-free.
Smooth surface for detailed line work.
Performs well with relief and intaglio methods.
Other Excellent Options
Kitakata Select – Strong and slightly thicker washi.
Zerkall Smooth – Excellent for crisp prints.
Somerset Satin – Luxurious and press-friendly.
Japanese Washi Awagami ‘onion’ nature paper is an eco-friendly paper choice
For a lightweight and eco-friendly paper choice consider checking out Awagami Factory. Above is the ‘onion’ variety of their nature paper, which I purchased to experiment with, so watch this space!
They produce organic papers, made partly from agricultural waste, such as corn, flower stems and onion peel, sourced from local farms, in Japan.
This method is to align with Mottainnai, from the old Japanese philosophy teaching one not to be wasteful. Awagami also have a fantastic range of other beautiful choices available.
✦ Choose Traditional Linoleum Over Soft Cut Alternatives
While art shops often recommend soft cut materials for beginners, traditional hessian-backed linoleum is still the preferred choice for high-quality, detailed linocuts.
Why Choose Traditional Linoleum?
Precision & Control: The firmer surface helps prevent over-carving.
Cleaner Lines: Holds detail beautifully for crisp results.
Better Feedback: You can feel the tool move through the lino, which helps with accuracy.
Durability: Traditional lino stands up to repeated print runs.
In contrast, soft cut or vinyl blocks can feel spongy, stretch under pressure, and may not deliver the same sharpness—making them less ideal for detailed or professional prints.
✦ Master Carving Technique: How Deep to Carve in Linocut?
A frequent beginner question is: how deep should I carve in linocut?
Here’s the short answer: not too deep.
Recommended Carving Depth
Aim for 1–2mm deep cuts.
Just deep enough to ensure your gouged areas won’t catch ink when rolled.
Deeper isn’t better—it can lead to messy prints and structural weakness in your block.
Use V-gouges for detail and U-gouges for clearing large areas. Always test on a scrap to check your carving depth before committing to the final design.
✦ Know Your Materials: Can You Wash Linocut Blocks?
Absolutely—but with care.
How to Clean Linocut Blocks
Water-based inks: Clean with warm water and mild soap.
Oil-based inks: Use vegetable oil or citrus-based ink cleaner to break down the ink first, then wipe clean.
Important:
Do not soak your linoleum. Traditional hessian-backed lino is porous and can warp or crack with excessive moisture. Instead, wipe gently with a damp cloth and dry thoroughly before storing.
My cleaning essentials basically consists of vegetable oil and clothes rags
✦ Why Use Oil-Based Relief Ink?
Water-based inks are convenient and easy to clean—but oil-based inks offer several serious advantages, especially for more experienced or professional work.
Benefits of Oil-Based Relief Ink
Superior Print Quality: Richer, deeper blacks and vibrant colors.
Longer Working Time: Doesn’t dry out on the block as quickly.
Archival & Lightfast: More durable and fade-resistant.
Versatile on Paper: Performs well even on textured or fibrous papers.
Popular Brands to Try:
Cranfield Caligo Safe Wash – Oil-based but cleans with soap and water.
Charbonnel – A premium option for traditionalists.
Graphic Chemical & Ink Co. – Widely used by professionals.
Be sure to work in a well-ventilated space when using traditional oil-based inks and always follow up with proper cleaning protocols.
Final Thoughts
With the right tools and practices—from using archival printmaking papers to understanding how deep to carve in linocut—you can elevate your work dramatically.
And yes, you can wash linocut blocks—just treat them with the respect they deserve.
Keep practicing, keep printing, and keep experimenting.
Linocutting is more than just a printmaking technique—it’s a gateway to bold, expressive, and hands-on creativity. Whether you're carving trees, typesetting by hand, experimenting with color, or printing on fabric, linocut offers a satisfying artistic experience for any skill level. With this guide, you now understand how linocut works, where it came from, how it compares to other forms of relief printing, and how to explore it on your own terms. You’ve also learned how linocut is effective as an artistic tool and where to begin your journey. Grab your tools, experiment fearlessly, and start creating—your next masterpiece is just one cut away!
For further insight into the art of linocutting you may find this article useful What Are Linocut Prints?